前言

之前的文章写过webp图片的调研,这篇分析一下fresco的decoder部分的源码,同时从响应、下载、解码、大小四个指标上对比同一张图片的webp 与jpg格式。这里响应时间应该与图片格式本身没有关系,但这里为了对服务器接口做一个测试也加入了对比;下载时间应该与图片size成正相关,这里也加入对比,看看结果是否符合预期。根据google官网介绍,目前WebP与JPG相比较,编解码速度上,毫秒级别上:编码速度webp比jpg慢10倍,解码速度慢1.5倍。在我们的使用场景下,编码速度的影响可以被忽略,因为服务器会在用户第一次请求时,编码生成jpg图片对应的webp图片,之后都会被缓存下来,可以认为几乎所有用户的请求都能命中缓存。解码方面,则是每个用户拿到webp图片都必经的开销,因此解码速度是本次测试对比的关键指标。

Fresco WebP支持

我们的客户端使用的是fresco图片库,根据其官方文档说明

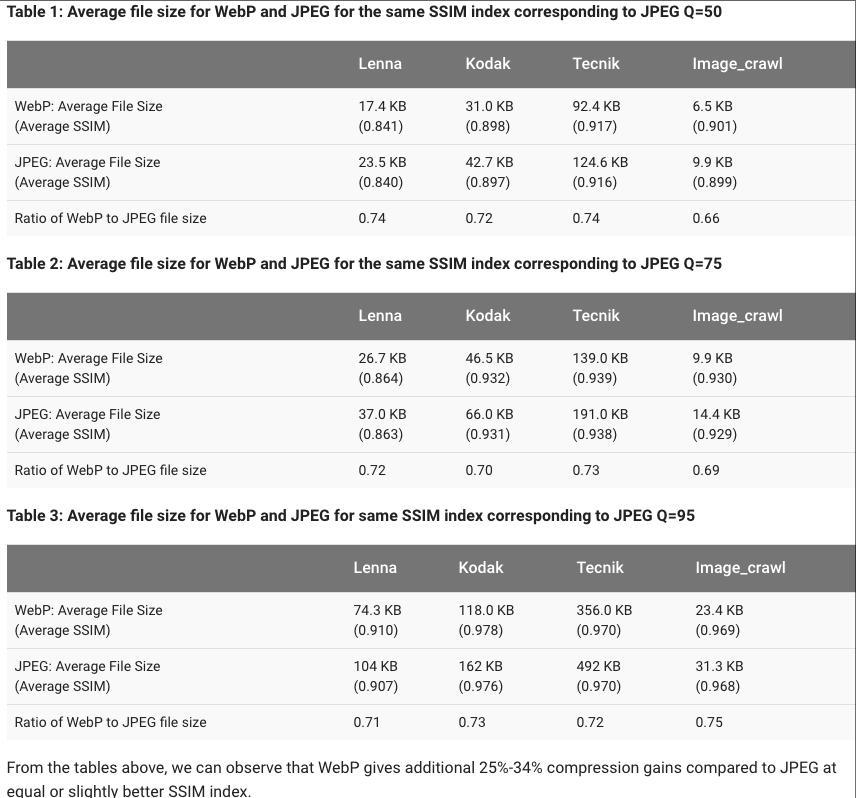
Android added webp support in version 4.0 and improved it in 4.2.1: 4.0+ (Ice Cream Sandwich): basic webp support 4.2.1+ (Jelly Beam MR1): support for transparency and losless wepb Fresco handles webp images by default if the OS supports it. So you can use webp with 4.0+ and trasparency and losless webps from 4.2.1. Fresco also supports webp for older OS versions. The only thing you need to do is add thewebpsupportlibrary to your dependencies. So if you want to use webps on Gingerbread just add the following line to your gradle build file: compile ‘com.facebook.fresco:webpsupport:1.3.0’

因此我们需要引入webpsupprot库,这样子fresco会处理对webp的支持。下面也会从源码上分析,fresco是如何解码webp的。

Fresco Producer源码分析

Producer继承结构

首先我们看一下Frecso中Producer的继承结构图:

fresco producer继承关系

Producer流水线

ProducerSequenceFactory是专门将生成各类链接起来的Producer,根据其中的逻辑,这里将可能涉及层次最深的Uri——网络Uri的Producer链在此列出,它会到每个缓存中查找数据,最后如果都没有命中,则会去网络上下载。

顺序 Producer 是否必须 功能
1 PostprocessedBitmapMemoryCacheProducer 在Bitmap缓存中查找被PostProcess过的数据
2 PostprocessorProducer 对下层Producer传上来的数据进行PostProcess
3 BitmapMemoryCacheGetProducer 使Producer序列只读
4 ThreadHandoffProducer 使下层Producer工作在后台进程中执行
5 BitmapMemoryCacheKeyMultiplexProducer 使多个相同已解码内存缓存键的ImageRequest都从相同Producer中获取数据
6 BitmapMemoryCacheProducer 从已解码的内存缓存中获取数据
7 DecodeProducer 将下层Producer产生的数据解码
8 ResizeAndRotateProducer 将下层Producer产生的数据变换
9 EncodedCacheKeyMultiplexProducer 使多个相同未解码内存缓存键的ImageRequest都从相同Producer中获取数据
10 EncodedMemoryCacheProducer 从未解码的内存缓存中获取数据
11 DiskCacheProducer 从文件缓存中获取数据
12 WebpTranscodeProducer Transcodes WebP to JPEG / PNG
13 NetworkFetchProducer 从网络上获取数据

为了获得每一张网络图片的大小、响应时间、下载时间、decode时间,我们需要探索Fresco的源码,挂上钩子去得到这些指标;这里我们关心DecoderProducerNetworkFetchProducer,顾名思义,这两个Producer分别用于解码和网络加载相关。

DecodeProducer解码过程

DecodeProducer负责将未解码的数据生产出解码的数据。先看produceResults方法。

1
2
3
4
5
6
7
8
9
10
11
12
  @Override
  public void produceResults(final Consumer<CloseableReference<CloseableImage>> consumer, final ProducerContext producerContext) {
    final ImageRequest imageRequest = producerContext.getImageRequest();
    ProgressiveDecoder progressiveDecoder;
    if (!UriUtil.isNetworkUri(imageRequest.getSourceUri())) {
      progressiveDecoder = new LocalImagesProgressiveDecoder(consumer, producerContext, mDecodeCancellationEnabled);
    } else {
      ProgressiveJpegParser jpegParser = new ProgressiveJpegParser(mByteArrayPool);
      progressiveDecoder = new NetworkImagesProgressiveDecoder(consumer, producerContext, jpegParser, mProgressiveJpegConfig, mDecodeCancellationEnabled);
    }
    mInputProducer.produceResults(progressiveDecoder, producerContext);
  }

通过判断uri的类型 选择不同的渐近式解释器,local和network都继承自ProgressiveDecoder

ProgressiveDecoder的构造方法中,doDecode(encodedImage, isLast) 进行解析。而真正解析的则是ImageDecoder#decodeImage方法,这个方法将encodedImage解析成CloseableImage

1
2
3
4
5
6
7
8
9
10
11
12
13
14
15
16
17
18
19
20
21
22
23
24
25
26
27
28
29
30
31
32
33
34
35
36
37
38
39
40
41
42
43
44
45
46
47
48
49
50
51
52
53
54
55
56
57
58
/** Performs the decode synchronously. */
private void doDecode(EncodedImage encodedImage, @Status int status) {
  if (isFinished() || !EncodedImage.isValid(encodedImage)) {
    return;
  }
  final String imageFormatStr;
  ImageFormat imageFormat = encodedImage.getImageFormat();
  if (imageFormat != null) {
    imageFormatStr = imageFormat.getName();
  } else {
    imageFormatStr = "unknown";
  }
  final String encodedImageSize;
  final String sampleSize;
  final boolean isLast = isLast(status);
  final boolean isLastAndComplete = isLast && !statusHasFlag(status, IS_PARTIAL_RESULT);
  final boolean isPlaceholder = statusHasFlag(status, IS_PLACEHOLDER);
  if (encodedImage != null) {
    encodedImageSize = encodedImage.getWidth() + "x" + encodedImage.getHeight();
    sampleSize = String.valueOf(encodedImage.getSampleSize());
  } else {
    // We should never be here
    encodedImageSize = "unknown";
    sampleSize = "unknown";
  }
  final String requestedSizeStr;
  final ResizeOptions resizeOptions = mProducerContext.getImageRequest().getResizeOptions();
  if (resizeOptions != null) {
    requestedSizeStr = resizeOptions.width + "x" + resizeOptions.height;
  } else {
    requestedSizeStr = "unknown";
  }
  try {
    long queueTime = mJobScheduler.getQueuedTime();
    long decodeDuration = -1;
    String imageUrl = encodedImage.getEncodedCacheKey().getUriString();
    int length = isLastAndComplete || isPlaceholder ? encodedImage.getSize() : getIntermediateImageEndOffset(encodedImage);
    QualityInfo quality = isLastAndComplete || isPlaceholder ? ImmutableQualityInfo.FULL_QUALITY : getQualityInfo();

    mProducerListener.onProducerStart(mProducerContext.getId(), PRODUCER_NAME);
    CloseableImage image = null;
    try {
      long nowTime = System.currentTimeMillis();
      image = mImageDecoder.decode(encodedImage, length, quality, mImageDecodeOptions);
      decodeDuration = System.currentTimeMillis() - nowTime;
    } catch (Exception e) {
      Map<String, String> extraMap = getExtraMap(image, imageUrl, queueTime, decodeDuration, quality, isLast, imageFormatStr, encodedImageSize, requestedSizeStr, sampleSize);
      mProducerListener.onProducerFinishWithFailure(mProducerContext.getId(), PRODUCER_NAME, e, extraMap);
      handleError(e);
      return;
    }
    Map<String, String> extraMap = getExtraMap(image, imageUrl, queueTime, decodeDuration, quality, isLast, imageFormatStr, encodedImageSize, requestedSizeStr, sampleSize);
    mProducerListener.onProducerFinishWithSuccess(mProducerContext.getId(), PRODUCER_NAME, extraMap);
    handleResult(image, status);
  } finally {
    EncodedImage.closeSafely(encodedImage);
  }
}

因此我们在#doDecoder方法在decode前后插入解码时长计算:

1
2
3
  long nowTime = System.currentTimeMillis();
  image = mImageDecoder.decode(encodedImage, length, quality, mImageDecodeOptions);
  decodeDuration = System.currentTimeMillis() - nowTime;

ImageDecoder

DecoderProducer 中是依赖ImageDecoder类,用来将未解码的EncodeImage解码成对应的CloseableImageImageDecoder中先判断未解码的图片类型:

1
2
3
4
5
6
7
8
9
10
11
12
13
14
15
16
  private final ImageDecoder mDefaultDecoder = new ImageDecoder() {
    @Override
    public CloseableImage decode(EncodedImage encodedImage, int length, QualityInfo qualityInfo, ImageDecodeOptions options) {
      ImageFormat imageFormat = encodedImage.getImageFormat();
      if (imageFormat == DefaultImageFormats.JPEG) {
        return decodeJpeg(encodedImage, length, qualityInfo, options);
      } else if (imageFormat == DefaultImageFormats.GIF) {
        return decodeGif(encodedImage, length, qualityInfo, options);
      } else if (imageFormat == DefaultImageFormats.WEBP_ANIMATED) {
        return decodeAnimatedWebp(encodedImage, length, qualityInfo, options);
      } else if (imageFormat == ImageFormat.UNKNOWN) {
        throw new IllegalArgumentException("unknown image format");
      }
      return decodeStaticImage(encodedImage, options);
    }
  };

ImageFormatChecker

这个类是根据输入流来确定图片的类型。基本原理是根据头标识去确定类型。根据代码能看出,这里分为几种。

1
2
3
4
5
6
7
8
9
  public static final ImageFormat JPEG = new ImageFormat("JPEG", "jpeg");
  public static final ImageFormat PNG = new ImageFormat("PNG", "png");
  public static final ImageFormat GIF = new ImageFormat("GIF", "gif");
  public static final ImageFormat BMP = new ImageFormat("BMP", "bmp");
  public static final ImageFormat WEBP_SIMPLE = new ImageFormat("WEBP_SIMPLE", "webp");
  public static final ImageFormat WEBP_LOSSLESS = new ImageFormat("WEBP_LOSSLESS", "webp");
  public static final ImageFormat WEBP_EXTENDED = new ImageFormat("WEBP_EXTENDED", "webp");
  public static final ImageFormat WEBP_EXTENDED_WITH_ALPHA = new ImageFormat("WEBP_EXTENDED_WITH_ALPHA", "webp");
  public static final ImageFormat WEBP_ANIMATED = new ImageFormat("WEBP_ANIMATED", "webp");

本篇我们关心以下几种: - JPEG - WEBP_SIMPLE - GIF - WEBP_ANIMATED

从是否静态图上来看,为两种: - 可动 ,用AnimatedImageFactory进行解析 - 不可动,用PlatformDecoder进行解析

AnimatedImageFactory

AnimatedImageFactory是一个接口,他的实现类是AnimatedImageFactoryImpl。 在这个类的静态方法块种,通过如下代码 来构造其他依赖包中的对象,这个小技巧我们可以get一下。

1
2
3
4
5
6
7
8
9
10
11
12
13
  private static AnimatedImageDecoder loadIfPresent(final String className) {
    try {
      Class<?> clazz = Class.forName(className);
      return (AnimatedImageDecoder) clazz.newInstance();
    } catch (Throwable e) {
      return null;
    }
  }

  static {
    sGifAnimatedImageDecoder = loadIfPresent("com.facebook.animated.gif.GifImage");
    sWebpAnimatedImageDecoder = loadIfPresent("com.facebook.animated.webp.WebPImage");
  }

AnimatedImageDecoder又分别有两个实现: - WebpImage - GifImage

WebpImage与GifImage

解析分为两个步骤: 1. 通过AnimatedImageDecoder解析出AnimatedImage 2. 利用getCloseableImage从AnimatedImage中构造出CloseableAnimatedImage。这是CloseableImage的之类。 getCloseableImage的逻辑如下: 1. 用decodeAllFrames解析出所有帧 2. 用createPreviewBitmap构造预览的bitmap 3. 构造AnimatedImageResult对象 4. 用AnimatedImageResult构造CloseableAnimatedImage对象。

PlatformDecoder

PlatformDecoder是一个接口,代表不同平台。我们看他的实现类有哪些:

PlatformDecoder具体实现

1
2
3
4
5
6
7
8
9
10
11
12
13
14
15
16
17
18
19
20
21
22
23
24
25
26
27
28
29
30
31
32
public interface PlatformDecoder {
  /**
   * Creates a bitmap from encoded bytes. Supports JPEG but callers should use {@link
   * #decodeJPEGFromEncodedImage} for partial JPEGs.
   *
   * @param encodedImage the reference to the encoded image with the reference to the encoded bytes
   * @param bitmapConfig the {@link android.graphics.Bitmap.Config} used to create the decoded
   * Bitmap
   * @return the bitmap
   * @throws TooManyBitmapsException if the pool is full
   * @throws java.lang.OutOfMemoryError if the Bitmap cannot be allocated
   */
  CloseableReference<Bitmap> decodeFromEncodedImage(final EncodedImage encodedImage, Bitmap.Config bitmapConfig);

  /**
   * Creates a bitmap from encoded JPEG bytes. Supports a partial JPEG image.
   *
   * @param encodedImage the reference to the encoded image with the reference to the encoded bytes
   * @param bitmapConfig the {@link android.graphics.Bitmap.Config} used to create the decoded
   * Bitmap
   * @param length the number of encoded bytes in the buffer
   * @return the bitmap
   * @throws TooManyBitmapsException if the pool is full
   * @throws java.lang.OutOfMemoryError if the Bitmap cannot be allocated
   */
  CloseableReference<Bitmap> decodeJPEGFromEncodedImage(EncodedImage encodedImage, Bitmap.Config bitmapConfig, int length);
}


getBitmapFactoryOptions 获取BitmapFactory.Options
decodeByteArrayAsPurgeable 获取bitmap
pinBitmap 真正的decode

NetworkFetchProducer

NetworkFetchProducer负责从网络层获取图片流,持有NetworkFetcher的实现类;测试代码中,我们添加了OkHttp3的OkHttpNetworkFetcher作为fetcher;我们关心NetworkFetchProducer中的这个方法:

1
2
3
4
5
6
7
  private void handleFinalResult(PooledByteBufferOutputStream pooledOutputStream, FetchState fetchState) {
    Map<String, String> extraMap = getExtraMap(fetchState, pooledOutputStream.size());
    ProducerListener listener = fetchState.getListener();
    listener.onProducerFinishWithSuccess(fetchState.getId(), PRODUCER_NAME, extraMap);
    listener.onUltimateProducerReached(fetchState.getId(), PRODUCER_NAME, true);
    notifyConsumer(pooledOutputStream, Consumer.IS_LAST | fetchState.getOnNewResultStatusFlags(), fetchState.getResponseBytesRange(), fetchState.getConsumer());
  }

该方法中FetchState记录了一张图片从服务端响应到IO读取的耗时记录。同样的,也是通过ProducerListener的#onProducerFinishWithSuccess方法回调出去。

计算decode & fecth的时间

每个Producer的接口实现,都会持有ProducerContext,其中的ProducerListener会回调Producer各个阶段的事件。我们关心这个方法:

/* * Called when a producer successfully finishes processing current unit of work. * @param extraMap Additional parameters about the producer. This map is immutable and will * throw an exception if attempts are made to modify it. / void onProducerFinishWithSuccess(String requestId, String producerName, @Nullable Map<String, >String> extraMap);

该方法会在Producer结束时回调出来,我们利用Fresco包里的RequestLoggingListener,便可监听到DecoderProducerNetworkFetchProducer的回调。

1
2
3
4
5
6
7
8
9
10
11
12
13
14
@Override
public void onCreate() {
    super.onCreate();
    FLog.setMinimumLoggingLevel(FLog.VERBOSE);
    Set<RequestListener> listeners = new HashSet<>(1);
    listeners.add(new RequestLoggingListener());
    ImagePipelineConfig config = ImagePipelineConfig.newBuilder(this)
        .setRequestListeners(listeners)
        .setNetworkFetcher(new OkHttpNetworkFetcher(OKHttpFactory.getInstance().getOkHttpClient()))
        .build();
    DraweeConfig draweeConfig = DraweeConfig.newBuilder().setDrawDebugOverlay(DebugOverlayHelper.isDebugOverlayEnabled(this)).build();
    Fresco.initialize(this, config, draweeConfig);
    Fresco.getImagePipeline().clearDiskCaches();
}

我们通过在Fresco初始化Builder中加入RequestLoggingListener,并改造RequestLoggingListener的onProducerFinishWithSuccess方法:

1
2
3
4
5
6
7
8
9
10
11
12
13
  @Override
  public synchronized void onProducerFinishWithSuccess(String requestId, String producerName, @Nullable Map<String, String> extraMap) {
    if (FLog.isLoggable(FLog.VERBOSE)) {
      Pair<String, String> mapKey = Pair.create(requestId, producerName);
      Long startTime = mProducerStartTimeMap.remove(mapKey);
      long currentTime = getTime();
      long producerDuration = -1;
      FLog.v(TAG, "time %d: onProducerFinishWithSuccess: " + "{requestId: %s, producer: %s, elapsedTime: %d ms, extraMap: %s}", currentTime, requestId, producerName, producerDuration = getElapsedTime(startTime, currentTime), extraMap);
      if (sOnProducer != null) {
        sOnProducer.onProducer(producerDuration, extraMap, producerName);
      }
    }
  }

通过将Producer的信息回调给外面,至此我们就拿到了每一个Producer的回调信息,通过producerName的过滤就可以拿到关心的信息,这里我们关心DecoderProducerNetworkFetchProducer的信息。

decode时间计算

DecoderProducer的doDecode方法中插入:

1
2
3
 long nowTime = System.currentTimeMillis();
 image = mImageDecoder.decode(encodedImage, length, quality, mImageDecodeOptions);
 decodeDuration = System.currentTimeMillis() - nowTime;

decodeDuration放入onProducerFinishWithSuccess的extraMap当中

network fecther时间计算

OkHttpNetworkFetcher中定义着几个常量值:

1
2
3
4
5
  public static final String QUEUE_TIME = "resp_time"; //修改为响应时间
  public static final String FETCH_TIME = "fetch_time";
  public static final String TOTAL_TIME = "total_time";
  public static final String IMAGE_SIZE = "image_size";
  public static final String IMAGE_URL = "image_url"; //新增
  • QUEUE_TIME为请求丢入请求线程池到最后请求成功响应的时间
  • FETCH_TIME为从response读完IO流的时间
  • IMAGE_SIZE为response header中的content-length,即图片大小

这些数据都最终会被丢入extraMap,回调给外面。

数据对比

jpg&webp指标对比:

jpg webp指标对比
格式 图片数 大小 响应时间 下载时间 解码时间 总用时
jpg 100 33497748B / 31.9MB 3384ms 5582ms 7225ms 16191ms
webp 100 11127628B / 10.6MB 3388ms 2552ms 9806ms 15746ms

以上数据经过几轮测试,都接近这个数据对比。 图片源来自项目线上的图片,图片接口来自公司CND接口,使用相同quality参数,带同一张图片的不同格式参数。解码总时间大概是JPG:WEBP = 1 : 1.3左右,接近官方的1.5倍性能差距。总大小上,webp几乎只有jpg的1/3,远超超官方的30%,这个估计是大多数jpg没有经过压缩就直接上传了。下载时间基本上与size成正比。

http://p1.music.126.net/6OARlbfxOysQJU5iZ8WKSA==/18769762999688243.jpg?imageView=1&type=webp&quality=100

http://p1.music.126.net/6OARlbfxOysQJU5iZ8WKSA==/18769762999688243.jpg?imageView=1&quality=100

gif&anim-webp指标对比:

gif&anim-webp指标对比
格式 图片数 大小 响应时间 下载时间 解码时间 总用时
gif 85 66343142B / 63.26MB 2597ms 6052ms 272ms 8921ms
anim-webp 85 20342068B / 19.39MB 2687ms 3809ms 240ms 6736ms

同样地, 分别取了同一张GIF图片的,原始版本与WEBP版本来对比。

http://p1.music.126.net/rhGo28bJP19-T0xmtpg6jw==/19244752021149272.jpg http://p1.music.126.net/rhGo28bJP19-T0xmtpg6jw==/19244752021149272.jpg?imageView=1&type=webp&tostatic=0

size压缩对比也接近1:3;另外这里的解码时间是不准确的,因为webp与gif在fresco中都是AnimatedImage,他们的decode调的是nativeCreateFromNativeMemory方法,这个方法返回是对应的WebPImageGifImage对象,表中的解码时间也是构建这个对象的耗时;动图渲染时,主要调用的是AnimatedDrawableBackendImpl中renderFrame方法。但我们可以粗略认为,每一帧的渲染耗时对比,接近jpg与webp的耗时;因为gif与anim-webp分别是由一帧一帧的jpg与webp组成。

总结

webp与jpg相比,包括anim-webp与gif, 在相同的图片质量,图片大小上,webp有着巨大的优势,解码速度毫秒级的差距也完全在接收范围内, 而图片大小最终转化为带宽、存储空间、加载速度上的优势。因此在有条件的情况,app中完全可以用webp来替代jpg格式以提升加载速度、降低存储空间、节省带宽费用。另外在android上,使用fresco作为图片库,可以几乎无成本的接入webp。

参考

webp图片介绍 http://changety.github.io/blog/2016/01/31/webp-research/

webp常见问题 https://developers.google.com/speed/webp/faq

fresco decode过程 https://guolei1130.github.io/2016/12/13/fresco%E5%9B%BE%E7%89%87decode%E7%9A%84%E5%A4%A7%E4%BD%93%E6%B5%81%E7%A8%8B/

WebP简介:

  WebP 格式是 Google 于2010年发布的一种支持有损压缩和无损压缩的图片文件格式,派生自图像编码格式 VP8。它具有较优的图像数据压缩算法,能带来更小的图片体积,而且拥有肉眼识别无差异的图像质量,同时具备了无损和有损的压缩模式、Alpha 透明以及动画的特性。目前googleG+、YouTube以及Google Play全站都在使用WebP格式的图片。15年双11手淘前端技术巡演中提到,淘宝3年前native层面就已经支持WebP, 两年前H5页面全面支持。QQ空间装扮、淘宝广告图,Facebook Android也都使用WebP。

以下通过研究WebP图片格式,尽可能全面地了解WebP图片的优劣势以及应用WebP图片给我们带来的收益以及风险,最终达到提升用户体验,提升图片加载速度,节省带宽的目的。


WebP优势

官方测试:

根据测试,WebP无损压缩的图片比PNG格式图片,文件大小上少 26%;

根据测试,WebP有损图片在同样SSIM质量指标上比JPEG格式图片少25~34%。 SSIM是一种衡量两张数字影像相似的指标

有损压缩测试方法简述:

1.将PNG图片设置不同的压缩参数压缩成JPEG图片,记录压缩后的对比的SSIM。

2.将同一张PNG图片压缩成WebP图片,压缩的WebP图片的SSIM指标必须比1中记录的SSIM高。

jpg、webp相同ssim测试

其他测试:

同样质量的WebP与JPG图片,在线加载速度测试。测试的JPG和WebP图片大小如下:

在线测试图片大小

测试数据折线图如下:

从折线图可以看到,WebP虽然会增加额外的解码时间,但由于减少了文件体积,缩短了加载的时间,页面的渲染速度加快了。同时,随着图片数量的增多,WebP页面加载的速度相对JPG页面增快了。所以,使用WebP基本没有技术阻碍,还能带来性能提升以及带宽节省。

通过以上两组对比可以得知,WebP在文件大小以及传输速度上肯定是拥有优势的,将极大节省用户及cdn流量。

动图

GIF 图片主要应用于图片分享类应用中,如微博等。与传统的 GIF 图比较,动态 WebP 的优势在于: 1.支持有损和无损压缩,并且可以合并有损和无损图片帧;

2.体积更小,GIF 转成有损动态 WebP 后可以减小 64% 的体积,转成无损可以节省 19% 的体积;

3.颜色更丰富,支持 24-bit 的 RGB 颜色以及 8-bit 的 Alpha 透明通道(而GIF 只支持8-bit RGB 颜色以及 1-bit 的透明);

4.添加了关键帧、metadata 等数据;

动图测试:

GIF动图1 63.9KB WebP动图1 28.9KB

GIF动图2 1.7MB WebP动图2 479KB

GIF动图3 2MB WebP动图3 208KB

WebP劣势:

1.各个端支持情况不一。这点会在下一节中详细说明。

2.迁移成本较大,需要对所有图片重新编码,考虑到对旧版的支持,需要额外开辟空间存两种格式的图片。

3.编解码速度上,根据Google的测试,目前WebP与JPG相比较,毫秒级别上,编码速度慢10倍,解码速度慢1.5倍。编码速度即可被没影响,我们只是在上传时生成一份WebP图片。解码速度则需要客户端综合节省下的流量来综合考虑。总之带宽节省比cpu消耗更有价值

4.尽管有不少app在使用WebP图片,但与JPG/PNG相比还是太少了,接受度并没有太高。

5.app中部分“归档化”的交互操作,比如图片保存,因此这些交互操作上需要进行WebP编解码成JPG。直接保存下来的webp图片,非常不方便reuse以及review。

WebP各端支持情况:

浏览器支持情况:

根据对目前国内浏览器占比与 WebP 的兼容性分析,大约有 50% 以上的国内用户可以直接体验到 WebP。

如何检测浏览器是否支持:

1.JavaScript 能力检测,对支持 WebP 的用户输出 WebP 图片

2.使用 WebP 支持插件:WebPJS

3.有一部分CDN厂商是提供webp检测服务

4.Http header accept type 返回接受的image typ

5.GooglePageSpeed提供自动将jpg转化成webp,提供给支持webp的浏览器上。

Android:

Android 4.0及以上原生支持; 4.0以下可以使用官方提供提供的编解码库

iOS:

iOS native 不支持,safari目前也不支持。据说ios 10的safari有可能会支持。native支持层面,google官方,以及第三方都提供了解决方案。国内也有不少ios团队在做webp图片的支持工作。

视觉设计:

Photoshop 原生是不支持WebP的,但有插件提供WebP支持。

webp各端支持情况

总结:

1.图片占据cdn服务中很大的一部分流量,更节省的图片流量对产品及用户肯定有巨大提升。一部分cnd厂商是支持webp转化服务或者web支持探测服务的,这点可以问我们的cdn厂商。

2.目前各端从jpg/png图片迁移肯定需要一段比较长的过程,并且需要cdn、后台等准备工作。

参考:

  1. WebP官方文档https://developers.google.com/speed/webp/

  2. 淘宝前端优化https://github.com/amfe/article/issues/21

  3. 腾讯WebP探寻https://isux.tencent.com/introduction-of-webp.html

  4. iOS WebP实践https://segmentfault.com/a/1190000006266276

  5. 七牛云存储WebP支持https://segmentfault.com/a/1190000002726138

  6. 探究WebP一些事儿http://web.jobbole.com/87103/

  7. Frequently Asked Questionshttps://developers.google.com/speed/webp/faq

  8. 七牛云图片处理http://blog.qiniu.com/archives/5793

  9. https://havecamerawilltravel.com/photographer/webp-website

前言

  目前移动客户端应用程序上,需要将用户内容持久化到设备上,一般任何feed流应用,如微博、推特、新闻客户端等都需要将内容做持久化操作,以便在内存回收后,再次进入程序能迅速恢复之前的内容。另外如一些视频、音乐、购物等软件,凡是收藏的视频、歌曲、商品以及个人主页等,也应将这些用户私有的内容做序列化,以便无网进入时也能看到相关内容,并正常使用软件。陆陆续续使用和测试过一些Java序列化方案,这篇主要从Android客户端应用程序的角度,并以速度、序列化文件大小、实践简易性为主要考虑指标介绍并对比以下序列化方案。


JVM-Serializsers

  首先介绍一下JVM-Serializsers,是一个很不错的测试序列化的工具,可以用它来评测各种流行的java序列化反序列化工具,在其测试模型上构建新的序列化使用上也很方便。本文结合JVM-Serializsers测试模型,并在其测试模型下新增测试了fast-serialization的测试。本文重点介绍Java原生序列化、Kryofast-serializationfastjsonprotocol-buffers等几种典型的序列化方案。


JVM-Serializsers下载源码后,具体步骤如下:

1.切到jvm-seruakuzaers源码tcp目录下:

2.编译源码:

3.运行测试案案例:

1
2
./run -chart -include=kryo,fst-serialization,java-built-in,protobuf,hessian,json/google-gson/databind,
xml/xstream+c,bson/mongodb,bson/jackson/databind,json/fastjson/databind,json/jackson/databind,thrift,avro-generic data/media.1.cks

include参数代表要进行测试的序列化工具,当然前提是在jvm-serialization中的测试模型下已经构建完相应工具的测试用例。更多参数可通过./run -help看说明,如果带上-chart参数,还会生成序列化性能数据的图形对比。


测试环境:

os:os x-10.9

jdk:java version “1.7.0_51”

mem:16G

cpu: 2.3 GHz Intel Core i7


运行结果:

表中参数介绍:

Total Time (“total”):创建一个对象,将其序列化成一个字节数组,然后再反序列化成一个对象。

Serialization Time (“ser”):创建一个对象,将其序列化成一个字节数组。

Deserialization Time (“deser+deep”):相比于序列化,反序列化更耗时。为了更公平的比较,jvm-serializers在反序列化测试时访问了反序列化得到的对象的所有字段(也就是deep的含义),因为部分工具反序列化时“偷懒”而没有做足工作。

Serialized Size (“size”):序列化数据的大小,这个大小会依赖于使用的数据。

Serialization Compressed Size (“size+dfl”):使用java内置的DEFLATE(zlib)压缩的序列化数据的大小。

Object Creation Time (“create”):对象创建耗时很短(平均100纳秒)所以通常的比较没什么意义。不过,不同工具创建的对象在表现上会有不同。有的工具只是创建普通的java类,你可以直接访问其字段,而有的使用get/set方法,有的使用builder模式。

该工具还将这些数据通过google chart服务生成数据图形对比图:

以上已经可以利用强大的JVM-Serializsers工具来分析跟构建自己想测试的序列化工具了,更多在Android Runtime的测试见下文。


Java序列化工具技术原理比较

Binary Formats & language-specific ones:

JavaBuiltIn(java原生)、JavaManual(根据成员变量类型,手工写)、FstSerliazationKryo

Binary formats-generic language-unspecific ones:

1
[Protobuf](https://code.google.com/p/protobuf/)、[Thrift](https://thrift.apache.org/)、 [AvroGeneric](https://avro.apache.org/docs/current/)、[Hessian](http://hessian.caucho.com/)

JSON Format:

JacksonGsonFastJSON

JSON-like:

CKS textual JSON-like format)、BSON(JSON-like format with extended datatypes)JacksonBson、MongoDB

XML-based formats:

XmlXStream

java的序列化工具大致就可以分为以上几类,简单概括就分为二进制binary和文本格式(json、xml)两大类。

从运行结果的图中可以较为明显的看出,在速度的对比上一般有如下规律:

1
2
binary > textual
language-specific > language-unspecific

而textual中,由json相比xml冗余度更低因此速度上更胜一筹,而json又bson这类textual serialization技术上更成熟,框架的选择上更丰富和优秀。下面重点介绍下Kryo、fast-serialiation、fastjson、protocol-buffer


典型Java序列化工具分析

(1) Java原生序列化工具

  Java本身提供的序列化工具基本上能胜任大多数场景下的序列化任务,关于其序列化机制,这篇文章很细致的解释了,值得一读。Java自带的序列化工具在序列化过程中需要不仅需要将对象的完整的class name记录下来,还需要把该类的定义也都记录下,包括所有其他引用的类,这会是一笔很大的开销,尤其是仅仅序列化单个对象的时候。正因为java序列化机制会把所有meta-data记录下来,因此当修改了类的所在的包名后,反序列化则会报错。Java自带序列化工具的性能问题总结如下:

  • 一个single object的序列化会递归地,连同所有成员变量(instsnce variables)一起序列化了,这种默认机制很容易造成不必要的序列化开销。

  • 序列化和反序列化过程需要上面的这种机制去递归并用反射机制去寻找所有成员变量的信息,另外如果没定义自己serialVersionUID的话,那么对象及其他变量都必须自己产生一个。上述过程开销很大。

  • 使用默认序列化机制,所有序列化类定义完整信息都会被记录下来,包括所有包名、父类信息、以及成员变量


(2) 优化过的Java序列化工具

  kryo

  kryo根据上述Java原生序列化机制的一些问题,对了很多优化工作,而且提供了很多serializer,甚至封装了Unsafe类型的序列化方式,更多关于Unsafe类型的序列化方式,请参考这里,需要注意的是,jdk1.7以后,默认关闭unsafe的类(sun.misc.Unsafe)包。更多kryo介绍参考kryo的wiki,这里贴一下kryo的典型用法。其中CompatibeFieldSerializer就是默认提供的一系列serializer的一种,顾名思义就是一种成员变量上下兼容的序列化工具,支持该类对成员变量的增删。另外kryo更新比较活跃,问题修复很快。

1
2
3
4
5
6
7
8
9
10
11
12
13
14
15
16
17
18
19
20
21
22
23
24
25
26
27
28
29
30
31
32
private static Kryo myKryo = new Kryo();
static {
    myKryo.register(MusicInfo.class, new CompatibleFieldSerializer<MusicInfo>(myKryo, Media.class), 50);
}
public static void saveObjectByKryo(Object o, String fileName) {
    Output output = null;
    try {
        output = new Output(new FileOutputStream(fileName), 8 * 1024);
        myKryo.writeObject(output, o);
    } catch (IOException e) {
        e.printStackTrace();
    } finally {
        if (output != null) {
         output.close();
        }
    }
}

public static Object readObjectByKryo(String filename, Class<?> clazz) {
    Input input = null;
    try {
        input = new Input(new FileInputStream(new File(filename)));
        return myKryo.readObject(input, clazz);
    } catch (Throwable t) {
        t.printStackTrace();
    } finally {
        if (input != null) {
            input.close();
        }
    }
    return null;
}

  fast-serialization

  fast-serialozation相对来说是一个很新的序列化工具,虽然从2-1的评测上来看,速度于kryo有一些差距,但根据本人在生产环境上的场景上测试,效果几乎于kryo一致,都能瞬间反序列化出内容并渲染,该序列化的原理描述:

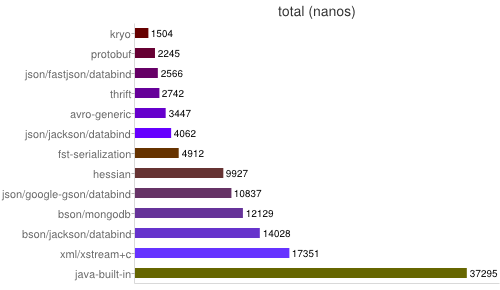
  • Fast Serialization reimplements Java Serialization with focus on speed, size and compatibility. This allows the use of FST with minimal code change.

  • FSTStructs implements a struct emulation to avoid de-/encoding completely. Use case is high performance message oriented software. Other applications are data exchange with other languages, reduction of FullGC by ‘flattening’ complex Objects, fast offheap, Control of data locality (CPU cache friendly) for high performance computational tasks, allocation free java programs.

这里贴一下fast-serialization的使用方法,如果原来系统使用的Java原生的序列化工具,替换成fast-serialization非常简单:只要把Java的ObjectOutputStream与ObjectInputStream替换成FSTObjectOutput和FSTObjectInput就行了:

1
2
3
4
5
6
7
8
9
10
11
12
13
14
15
16
17
18
19
20
21
22
23
24
25
26
27
28
29
30
31
32
33
34
35
36
37
38
39
40
public static boolean saveObjectByJava(Object o, String filename) {
    FSTObjectOutput oos = null;
    ObjectOutputStream oos = null;
    try {
        oos = new FSTObjectOutput(new FileOutputStream(filename));
        oos.writeObject(o);
        oos.flush();
        return true;
    } catch (IOException e) {
        e.printStackTrace();
    } finally {
        if (oos != null) {
        try {
            oos.close();
            } catch (IOException e) {
            e.printStackTrace();
            }
        }
    }
    return false;
}
public static Object readObjectByJava(String filename) {
    FSTObjectInput ois = null;
    ObjectInputStream ois = null;
    try {
        ois = new ObjectInputStream(new FileInputStream(filename));
        return ois.readObject();
    } catch (Throwable t) {
        t.printStackTrace();
    } finally {
        if (ois != null) {
            try {
                ois.close();
            } catch (IOException e) {
                e.printStackTrace();
            }
        }
    }
    return null;
}

(3)JSON

  从上一节的多种序列化工作的表现来看,比较优秀的JSON解析工具的表现还是比较好的,有些json解析工具甚至速度超过了一些二进制的序列化方式。Android环境下也有评测json解析性能的demo,下图可以看出jackson在速度上还是比较有优势的,但与Android自带的json包,也没有数量级以上的优势,而jackson的jar包大小达1mb多,因此对于普通的android应用来说是比较奢侈的。

4)Protocol-Buffer

  Protocol buffers是一个用来序列化结构化数据的技术,支持多种语言诸如C++、Java以及Python语言,可以使用该技术来持久化数据或者序列化成网络传输的数据。相比较一些其他的XML技术而言,该技术的一个明显特点就是更加节省空间(以二进制流存储)、速度更快以及更加灵活。 通常,编写一个protocol buffers应用需要经历如下三步:

1、定义消息格式文件,最好以proto作为后缀名

2、使用Google提供的protocol buffers编译器来生成代码文件,一般为.h和.cc文件,主要是对消息格式以特定的语言方式描述

3、使用protocol buffers库提供的API来编写应用程序

具体方法可参考google Protobuf 提供的详细的developer guide


总结

  • 就已有原先使用Java原生序列化方案的系统来说,kryo于fst-serializer是良好的java原生序列化方案替代者,不仅体现再编程简单,而且速度与性能上会有大幅提升,尤其是fst-serializer ,只需替代output/inputstream 即可,性能的提升上也很可观,目前该工具刚出来,稳定性还需要多测测。

  • 如果程序本身就用json格式序列化,则可以考虑引入一个性能优异的json解析库,一般再服务端jackson是广受欢迎的解析库,但是其1.1mb的jar包大小对一般的Android应用有点奢侈,而fastjson在Android上的表现似乎没有再JDK上那么好,不过也比大多数解析库快了。另外用textual格式序列化对象,在Android客户端上还要考虑一些安全问题。

  • protobuffer更多的是一种取代xml的夸语言的消息交换格式,尽快速度很快,但是编程上需要定义消息格式,对成员变量多、业务复杂的javabean来说代价是较为复杂的,对稳定的已有系统来说总体代价较高。

下表是几种方案的各项指标的一个对比 :

序列化工具 序列化速度 序列化文件大小 编程模型复杂度 社区活跃度 jar包大小
kryo 极快 简单 132kb
fst-serializer 非常简单 246kb
protobuffer 较大 复杂 稳定 329kb
fastjson 较快 较大 简单 稳定 338kb
jackson 一般 较大 简单 稳定 1.1mb
gson 较慢 较大 简单 稳定 189kb

参考资料

Java序列化机制介绍及简单优化方法: http://www.javacodegeeks.com/2010/07/java-best-practices-high-performance.html

Java序列化“最佳”实践: http://www.javacodegeeks.com/2010/07/java-best-practices-high-performance.html

提升Java序列化的几种方法: http://www.javacodegeeks.com/2013/09/speed-up-with-fast-java-and-file-serialization.html

详细的Java序列化过程: http://blog.csdn.net/zhaozheng7758/article/details/7820018

Unsafe类型的Java序列化方法: http://www.javacodegeeks.com/2012/07/native-cc-like-performance-for-java.html

protobuf介绍1:http://www.ibm.com/developerworks/cn/linux/l-cn-gpb/

protobuf介绍2: http://www.cnblogs.com/royenhome/archive/2010/10/29/1864860.html

前言

之前这篇介绍了如何在mac下部署octopress,这篇还介绍了一台mac上维护同时维护多个octopress的方法,本篇再介绍一下如何再多台设备上,同时维护一个octopress blog上的方法。


octopress blog的repo分支说明

一个octopress blog的repo由source、master两个分支组成。

source分支位于 cd ~/octopress

1
2
cd ~/octopress
git branch # *source

这个分支用于存放markdown源文件,theme,plugin等用于生成blog所需要的所有文件的,因此之前我们写博客的时候,提交的内容,一般都到在source上:

1
git push origin source #即将本地内容push到远端git repo 的source分支上。

master分支位于 cd ~/octopress/_deploy中,这个分支用于存放blog站点本身

1
2
cd ~/octopress/_deploy
git branch # *master

在新的设备上部署已有的octopress

首先像构建全新octopress 一样, 准备好octopress的部署环境

1
$ git --version

git的版本号对安装octopress影响不大,这里不用关心,只要有git工具就可以了。

1
$ ruby --version #shold be 1.9.3#p125 or other version can be set up an octopress

配置环境的方法参考这里

理解octopress blog的工作原理以及分支组成后,新的设备复制已有的octopress blog 只要把source/master clone到本地,并安装完成类似构建新octopress blog一样的配置及工具即可。以下是具体步骤:

将source分支 clone到 octopress目录下

1
git clone -b source git@github.com:username/username.github.com.git octopress 

将master分支 clone到 octopress/_deploy目录下

1
2
$ cd octopress #进入到octopress目录下,看看_deploy是否存在,存在的话且不为空,先清空
$ git clone git@github.com:username/username.github.com.git _deploy  #clone master分支

安装配置工作

1
2
3
$ gem install bundler
$ rbenv rehash
$ bundle install

注意:由于远端的blog可能已经配置主题、所以省去安装默认主题的这一步: rake install

关联blog

1
rake setup_github_pages

提示你输入关联的repo的 git url

1
Enter the read/write url for your repository

输入需要关联的repo的git url即可, 比如 git@github.com:username/username.github.com

关联完成后,检查一下:

1
2
3
4
5
6
git remote -v

octopress git://github.com/imathis/octopress.git (fetch)
octopress git://github.com/imathis/octopress.git (push)
origin    https://github.com/username/username.github.io (fetch)  #关联blog 的远程 repo
origin    https://github.com/username/username.github.io (push)

至此,如果没有错误的话,本地已经完成了一个已有octopress blog复制跟关联。

在两台设备上写blog

接下来其实就与git 上共同开发项目一样,首先需要pull下来最新的远端repo的内容,本地做出修改后,也要将内容push到远端。每次同步与提交,都要把source/master两个分支的同步。

比如新部署完成的 A电脑上写一篇文章:

1
2
3
4
5
6
7
rake new_post['new post on new computer']

git add .
git commit -m 'create a new post in new compter'
git push origin source #push source内容到repo上

rake deploy 发布blog

切到另一台B电脑上:

1
2
3
4
cd octopress
git pull origin source  # 同步source分支
cd octopress/_deploy
git pull origin master  # 同步master分支, 因为之前rake dedploy会修改master的内容

此后,在这台B电脑上修改并且 rake deploy后,在A电脑上也需要先pull 完两个分支的内容。

总结:

1.pull source 分支、pull master分支

2.写文章、改主题…… (git commit)

3.git push origin source

4.rake deploy(相当于push到远端master分支)


前言

上篇介绍了如何在mac下部署octopress,可能少有人会跟我一样折腾,还打算在一台mac上维护两个octopress blog,这里介绍一下具体办法,一言以蔽之就是在其他目录下再创建一个octopress,以后在此目录下维护第二个blog,以下是具体流程。

创建第二个octopress blog的repo

github不支持同一个账户创建多个github page的repo, 因此再去申请另一个github帐号就可以了,然后依然是首先到github创建一个anotherUsername.github.io的repo,anotherUsername.github.io以后就是第二个blog的域名

准备安装Octopress所需的环境

由于有了第一个octopress blog的安装基础, 因此默认认为mac上已经有了octopress的环境:

1
$ git --version

git的版本号对安装octopress影响不大,这里不用关心,只要有git工具就可以了。

1
$ ruby --version #此时应该已是1.9.3p125 (2012-02-16 revision 34643),或者其他你成功安装了octopress的ruby版本

安装第二个Octopress

一般第一个octopress一般都装在 cd ~/octopress 下,这里假设把第二个octopress安装在 ~/anotherBlog/octopress

1
2
3
4
$ cd ~
$ mkdir anotherBlog #作为第二个octopress所在目录
$ cd anotherBlog
$ git clone git://github.com/imathis/octopress.git octopress 

同样安装完依赖跟默认主题

首先查看一下~/anotherBlog/octopress下的ruby版本:

1
$ruby --version #如果跟第一个octopress所在目录下version版本一致即可,不一样的话,参考第一篇中介绍rbenv 环境变量的设置
1
2
3
4
5
$ gem install bundler
$ rbenv rehash
$ bundle install

$ rake install #默认主题

运行以下命令,仔细看提示完成github和Octopress的关联(就是第一步创建的第二个博客的repo https://github.com/anotherUsername/anotherUsername.github.io

1
$ rake setup_github_pages

关联成功后可以看下:

1
$ git remote -v #关联的远程repo信息

正确关联的话就会如下显示:

1
2
3
4
octopress    git://github.com/imathis/octopress.git (fetch)
octopress git://github.com/imathis/octopress.git (push)
origin    https://github.com/anotherUsername/anotherUsername.github.io (fetch)
origin    https://github.com/anotherUsername/anotherUsername.github.io (push)

接下来生成blog

1
2
3
$ rake generate

$ rake preview #http://localhost:4000# ,preview一下另一个blog

打开http://localhost:4000/,就能看到第二个octopress blog也建起来了。

至此第二个octopress blog 就搭建完了,就可以在一台mac下同时维护多个blog了,之后写blog、装插件、换配置就都一样了。够折腾吧- -!

前言

前段时间云音乐Android小组打算自己搭建一个blog,用于总结跟记录工作中遇到的技术问题。之前自己在其他地方记录过几篇blog,也一直想搭个blog的玩玩,借此机会正好操练。 出于对Github极大的好感,自然就想到利用Github Page服务搭建一个blog,网络上已经存在大量关于利用Github与Octopress搭建blog的文章,但是质量参次不齐,实际我在搭建的过程中就遇到了不少问题,这里记录一下其他文章中忽略的一些细节,梳理一下流程,同时帮碰到相同问题的同学节省时间。可能少有人会跟我一样折腾,还打算在一台mac上维护两个octopress blog、其中一个octopress blog 还需要在多台设备上一起更新(android 小组),因此这篇blog先介绍创建一个常规octopress blog的步骤,之后再介绍下一台电脑上维护两个octopress blog 以及 一个octopress blog 在多个地方(电脑)上更新的方法。


配置github信息

默认你已经创建了github帐号,如果还没有,先到github上注册一个,记得起一个酷炫或者有特殊意义的username,这会是个稍候blog域名的prefix。并且默认你已经完成本机上完成github帐号信息的配置,如果还没有,请查看github help


节省漫长的十多分钟等待时间

首先到github创建一个username.github.io的repo,username.github.io以后就是blog的域名(当然他支持使用自定义的域名), username就是你在github上的username。之所以先完成这一步,是因为github一般需要10分钟左右来同步缓存数据,一般创建完repo后,直接访问,浏览器会告诉你这个:


准备安装Octopress所需的环境

这里是Octopress的官方指南,里面很精简的描述了安装步骤,我这里再啰嗦一次(主要是想讲坑

安装octopress时,首先需要git跟ruby环境,这两样工具,一般mac都已经自带了,可以在terminal里分别

1
$ git --version

git的版本号对安装octopress影响不大,这里不用关心,只要有git工具就可以了。

1
$ ruby --version

如果打印出来的ruby版本信息是1.9.3,那接下来的安装会省却不少麻烦。ruby的向下兼容不好,因此基于Ruby所做的框架大多要求特定版本,octpress也是,这里就提到需要ruby 1.9.3这个版本,我当时想试试mac自带的2.1.1这个ruby版本上的安装,结果是一坑接一坑,会缺各种各样依赖,所以不想折腾的朋友老实安装1.9.3这个版本好了。ruby多版本管理可以用RVM和rbenv。在mac下,推荐使用Homebrew来安装rbenv(ruby社区普通推荐rbenv),如果你没有Homebrew,打开终端,先安装完Homebrew,根据终端一步一步安装完就好,基本不会遇到什么问题。

1
$ ruby -e "$(curl -fsSL https://raw.github.com/Homebrew/homebrew/go/install)"

有了Homebrew就可以安装rbenv了

1
2
3
$ brew update 
$ brew install rbenv
$ brew install ruby-build

使用rbenv安装1.9.3版本的ruby,ruby1.9.3下还有多次发行版,稳妥期间,推荐直接安装1.9.3-p125,参考过其他blog的经验

1
2
3
4
$ rbenv install 1.9.3-p125
$ rbenv local 1.9.3-p125 #Sets a local application-specific Ruby version
$ rbenv rehash
$ ruby --version #ruby 1.9.3p125 (2012-02-16 revision 34643) [x86_64-darwin13.1.0]

安装完成后可以用ruby –version进行验证,那么问题就来了,虽然上面敲了rbenv local设置在当前的ruby版本环境,终端很有可能显示的还是mac自带的版本,原因是因为还没有在

1
cd ~/.bash_profile

配置rbenv的环境变量,具体步骤如下: (更详尽的配置说明参考这里

Add ~/.rbenv/bin to your $PATH for access to the rbenv command-line utility.

1
$ echo 'export PATH="$HOME/.rbenv/bin:$PATH"' >> ~/.bash_profile

Ubuntu Desktop note: Modify your ~/.bashrc instead of ~/.bash_profile. Zsh note: Modify your ~/.zshrc file instead of ~/.bash_profile.

Add rbenv init to your shell to enable shims and autocompletion.

1
$ echo 'eval "$(rbenv init -)"' >> ~/.bash_profile

Same as in previous step, use ~/.bashrc on Ubuntu, or ~/.zshrc for Zsh.

1
$ source ~/.bash_profile

然后再切到~/octopress下,

1
$ ruby --version #此时应该已是1.9.3p125 (2012-02-16 revision 34643)

安装Octopress

准备完毕octopress所需的环境后,就可以按照官方指南安装Octpress了

clone octopress

1
$ git clone git://github.com/imathis/octopress.git octopress

安装依赖

1
2
3
4
$ cd octopress
$ gem install bundler
$ rbenv rehash
$ bundle install

安装octopress默认主题

1
$ rake install

接下去会专门写一篇关于octopress主题的blog


运行以下命令,仔细看提示完成github和Octopress的关联(就是第一步创建的这个repo https://github.com/username/username.github.io

1
$ rake setup_github_pages

创建博客

生成博客

1
$ rake generate 

上传代码

1
2
3
$ git add .
$ git commit -m 'create first blog'
$ git push origin source

部署博客

1
$ rake deploy

这里origin代表与octopress关联的repo 此时如果顺利完成后就能直接访问http://username.github.io看到自己的博客了, 由于首先创建了repo,就不需要等待10分钟了。

修改配置

配置文件路径为~/octopress/_config.yml

1
2
3
4
5
6
7
8
9
10
11
url:                # For rewriting urls for RSS, etc
title:              # Used in the header and title tags
subtitle:           # A description used in the header
author:             # Your name, for RSS, Copyright, Metadata
simple_search:      # Search engine for simple site search
description:        # A default meta description for your site
date_format:        # Format dates using Ruby's date strftime syntax
subscribe_rss:      # Url for your blog's feed, defauts to /atom.xml
subscribe_email:    # Url to subscribe by email (service required)
category_feeds:     # Enable per category RSS feeds (defaults to false in 2.1)
email:              # Email address for the RSS feed if you want it.

编辑完成后

1
2
3
4
5
6
7
$ rake generate

$ git add .
$ git commit -m "settings" 
$ git push origin source

$ rake deploy

写博客

到此为此博客已经成功搭建,赶紧测试一篇hello world的blog压压惊

创建博文

1
$ rake new_post['hello world']

生成的blog文件在~/octopress/source/_posts目录下,接下来可以用你所熟悉的markdown工具写博客了。

使用markdown写博文

如果一开始对markdown的语法不熟悉,这里推荐一个在线学习markdown语法的网站),所见即所得;或者可以直接其他blog上的用markdown写的文章,fork下来,参考样式与语法的比对,这样上手还是很快的。 写完后使用以下指令,并在浏览中输入localhost:4000, 查看blog的效果

1
$ rake preview #localhost:4000

调试完后,生成blog并部署到github page上

1
2
3
4
5
6
7
$ rake generate

$ git add .
$ git commit -m "comment" 
$ git push origin source

$ rake deploy

以上便是创建一个octopress blog的全部过程了,下一篇会继续说明如果在一台电脑上管理多个octpress blog 以及 一个octopress在多台电脑上共同维护的方法。


参考资料